Here is an explanation of all of the tabs in VISION Security:
Users Tab
Security Profiles Tab
Projects Tab
Folders Tab
Tools Tab
Users Tab
These are the accounts that people will use to enter (log into) the VISION Developer module and its related applications, including this one. You can use these accounts to restrict access to specific projects or editing rights within different projects. You can also create or delete user accounts here.
 VISION Users List & Info
•VISION Users List: This is a list of VISION user records. Highlight the user record you wish to view or edit. •User Info: oLogin Name: The name the user will use to log into VISION Developer. oSystem ID: The system-generated ID for this user record. It cannot be edited. oFirst Name: The first name of the user. oLast Name: The last name of the user. oPhone: The user's work phone number (optional). oFax: The user's work fax number (optional). oEmail Address: The user's work email address number (optional). oJob Title: The user's job title (optional). oDepartment: The department in which the user works (optional). •Licensed user: Check this box if the user record you are creating is for a normal, active VISION user. You can create non-licensed accounts for people who might need to review data in VISION, but those accounts will always be "read only". |
User Privileges and Restrictions
These privileges apply to the user, regardless of what project the user is in.
•Account suspended: The account information will be saved, but this user will not be able to log into the VISION Developer module with these credentials. •Can run this security program: Whether the user can open this Security program and make changes to projects or user records. •Can run VISION: Whether the user can log into the VISION Developer module. •Can alter shared tables: Whether the user can make changes to cross reference tables that are shared between projects. •Can edit lists in VISION: Whether the user can add to or change the editable lists in VISION Developer. •Can expire task qualifications: Whether the user is allowed to expire someone else's qualification on a task. •Can run Import/Export Utility: Whether the user is allowed to import data into and export data from the VISION project. •Can run Table Utility: Whether the user is allowed to open the external VISION Cross-Reference Table Utility program in another window. |
New User/Save Changes
Click this button to add a new user record or save the user record you are editing.
 Note that in order for a new user to log into VISION, the user's login must also be entered either in Active Directory if connecting in single connection mode, or directly in your MSSQL instance if NOT connecting in single connection mode. This must be done outside of this program.
Delete User/Cancel Changes
Click this button to delete a user record or cancel your changes to a user record you are editing.
Exit Button
Click this button to close the VISION Security program.
Security Profiles Tab
Create and edit security profiles that define different levels of access.
The permissions a user enjoys in project "P" apply to objects "owned" by project "P". Those objects could appear in other projects, through sharing, but it's the owning project that matters. The name of the owning project appears on each object's workscreen, near the top right corner on the first tab of the workscreen. It also appears as the second project name in the VISION status bar.
"Write" Permission
"Write" permission means permission to create, edit, delete, and some kinds of linking and unlinking.
The effect of write permission on linking and unlinking is more nuanced than the effect on creating, deleting, and editing. You don't generally need to think about this, as linking and unlinking privileges derive logically from the choices you make concerning creating, deleting, and editing. But here's an example, to illustrate these nuances:
Suppose you have read-only permission for objectives. That would not prevent you from linking or unlinking questions to or from an objective. That's because altering the set of questions for an objective is not considered a change to the objective. On the other hand, you would not be able to move or share an objective in its own project hierarchy, because that would constitute a change to the parent objective. Yet you could still share or unshare that objective in a hierarchy belonging to a different project where you do happen to have objective-write permission. That's because a hierarchy link constitutes a change only to the parent objective, which in this case belongs to a different project.
General write permission is curtailed by exceptions, or "secondary" privileges. Those are represented by the checkboxes. For example, a security profile may grant write permission for analysis items, but deny permission to change Completed tasks. Under that profile, it will be possible to edit and delete analysis items, except tasks that have an analysis status of "Completed". (See the "Analysis" tab on the task workscreen.)
This relationship is the reason why the checkboxes enable and disable according to the primary access rights; most checkboxes are relevant only when their associated primary access right is set to Read/Write.
|
Selected Profile
•Name: Name of the highlighted profile. •System ID: Unique system-generated ID of the highlighted profile. •Description: Any information entered for the profile. •New Profile/Save Changes: Click this button to add a new profile or save the profile you are editing. •Delete Profile/Cancel Changes: Click this button to delete a profile or cancel your changes to a profile you are editing. |
Primary Access Rights
•Analysis: Analysis write access allows creating, editing, deleting, and unlinking from the hierarchy any Analysis object: Task, S/K, Function--anything in the analysis hierarchy (owned by that project). •Objectives: Write access grants permission to create, edit, delete, and link/unlink any objective (owned by that project) •Programs: Write access grants permission to create, edit, delete, and link/unlink any program (owned by that project). •Question and Tests: Write access grants permission to create, edit, delete, and link/unlink any question (owned by that project). •Tables: Write access grants permission to create, edit, and delete Cross Reference Tables and their items. (On VISION's main menu bar, the menu item Cross Reference:Open lists the Cross Reference Tables visible in the current project.) oHowever, there is a separate permission for "shared" tables, because those don't belong to any single project. They're visible in all projects. Consequently, permission to alter (create, edit, and delete) shared tables is a privilege associated directly with the user, not with a security profile. So that privilege appears on the Users tab in the Security program: oIncidentally, note that there is another user privilege in the image above: "Can edit lists in VISION". This privilege concerns the entries that appear in the various drop lists in VISION. •Reports: Write access grants permission to create, edit, and delete any report on the Reports list. •Documents: Write access grants permission to create, edit, and delete any report on the Documents list. oThe only difference between "Reports" permission and "Documents" permission is that one applies to the reports on the "Reports" list, while the other applies to reports on the "Documents" list. |
Secondary Access Rights
• Can change "Completed" Tasks: This allows for an exception to general analysis-write permission. Thus a profile can grant write permission for analysis items except for tasks having status "Completed" (checkbox unchecked). oNote that without this privilege, not only can't a user edit or delete "Completed" tasks, they can't set the task status to or from "Completed" either (which makes sense). •Can change "Approved" objectives: This allows making an exception for objectives in an "Approved" status. Thus someone can have permission to edit/delete objectives, but not approved ones. This also controls permission to set or unset the status to Approved. •Can change "Completed-Active" Programs: Like the other checkboxes, this allows making an exception for some programs--those in the Completed-Active status. (See the "Training Info" tab on the program workscreen.)When checked, the profile allows creating, editing, and deleting any program in the project. When unchecked, "Complete-Active" programs can't be changed, while other programs can be (or not, depending on whether the profile includes general read/write access to programs). •Can change "Active" questions: If a profile allows general Read/Write access to questions and tests, but has this checkbox unchecked, then someone assigned to this profile can create, edit, and delete questions, but can't edit or delete questions in the "Active" status. oLike other checkboxes of this kind, it also controls whether the user can change the status to or from the protected value ("Active"). •Can approve exams: This allows the user to move tests (exams) into an "Approved" status. This status allows tests to be delivered to learners, but it also prevents the test from being edited again. Once Approved, a test can only be Disqualified. •Can change "Approved" qual cards: Qual Cards are available only if the VISION Learning Station is installed. A Qual Card is a list of tasks pulled from the hierarchy. So for security it falls in the analysis category. In general, analysis read-permission is all that is required to create, edit, or delete Qual Cards. But the checkbox allows protecting Qual Cards that are in the "Approved" status. •Can change labels on Read/Write objects: On the VISION data workscreens, a few of the text boxes can be re-labeled. A label applies to all objects of the same kind (analysis, or objectives, etc.) throughout a project. oThis checkbox, in conjunction with the primary access rights defined in this security profile, controls permission to re-label. See the Fonts & labels sub-tab for more information. |
One Profile, Multiple Definitions
A profile "definition" is the collection of access rights associated with that profile name. A single profile name can have multiple definitions: namely, a "general" definition and possibly independent definitions for one or more projects.
The general definition of a profile is used for all projects that don't have their own independent definitions of that profile.
That means a user who is assigned access to a project under a particular security profile enjoys the privileges specified in the general definition of that profile, unless there happens to be an independent definition of the profile for that project. In that case, the user enjoys the privileges specified in that project-independent definition of the profile, rather than the privileges specified in the general definition.
General Definition
When a profile is first created, it has only a "general" definition. In this state, the general definition applies to any and all projects it is used with. The general definition may be all that is ever needed for that profile.
|
Independent, Project-Specific Definition
However, a profile can also have an independent definition for a project. For example, a profile may have an independent definition for project "X". In that case, any user assigned project X under that profile will enjoy the privileges specified in the definition of that profile for project X, not the privileges specified in the general definition.
To redefine a profile for a particular project, select the "For Project" button, and then select the desired project in the adjacent drop list.
|
Deleting Profile Definitions
When the General definition of a profile is selected, note that the delete button is labeled "Delete Profile". If you delete a profile, all its definitions are deleted – both the general and any project-specific definitions of it. Anyone assigned to a project under that profile has no access to the project until they are reassigned to the project under another profile.
On the other hand, when a project-specific definition of a profile is selected, the delete button is labeled "Delete Definition". If you delete a project-specific definition, only that project's definition of the profile is deleted. The other definitions of that profile survive. Anyone assigned to that project under that profile now enjoys the privileges specified in the general definition of the profile. Note that you can't delete the definition for a password-protected project.
|
Why Multiple Definitions?
You don't have to redefine a security profile for each project. The general definition is sufficient for basic usage. The ability to redefine a profile on a project-by-project basis was not a target feature, but a necessary consequence of another feature: password-protection for projects. Note the lock button in the bottom right of the Projects tab.
You can use this button to assign a password to a project. Assigning a password does NOT mean the end users have to know this password in order to login to the project. No, they login to a password-protected project in the same way that they login to any project. Rather, the project password is what someone has to enter in the Security program in order to assign anyone permission to that project. This is useful if you don't want a project to be accessible to just anyone who has permission to login to the Security program.
|
Technical Justification
To enforce password protection, it was also necessary to protect the security profiles used with that project as well. But this could easily lead to a state in which the profiles become locked up with passwords and thereby become uneditable without having to enter the passwords for all the password-protected projects that use them.
To avoid this problem, the Security program automatically creates independent definitions of any profile used by a password-protected project. This is the primary reason for independent definitions of a profile. Initially, the project-specific definition is an identical copy of the general definition. But those project-specific definitions of the profile require the project password in order to edit. That prevents circumvention of the project protection that could otherwise be accomplished by modifying the profiles used with it. Meanwhile, the general definition of the profile remains unprotected, so that it can be freely edited, without having to enter the passwords for every project that uses it.
|
Projects Tab
Set options for the selected project(s).
Project List
Select the status of the projects you wish to view:
•Enabled: These projects are in use. •Disabled: These projects are being stored but cannot be used. (Projects can be disabled on the Options Tab) •All: Both Enabled and Disabled projects. Some project information is coded by font or color (note that these traits may appear in combination):
•Bold: the selected user (at right) has some degree of access to the project. This is only applicable when the Access sub-tab is also selected. •Faded: The project is disabled. •Red: The project is password protected. |
See a list of users compared to the list of projects. You can use this interface to assign or un-assign users to and from projects.
•Users List: A list of users. Select which users to view in the "For selected PROJECT" menu. Boldfacing signifies that the user has some degree of access to the project selected at left. •For selected PROJECT: Whether to display users assigned to the selected project, users who haven't been assigned to the selected project, or both. •For selected USER: Whether to display projects assigned to the selected user, projects that haven't been assigned to the selected user, or both. •Assign project access (Security Profile) for selected users: Assign a Security Profile for the selected project(s) to the selected user(s). |
• Disable project (prevents anyone from entering the project): Store the project data but prevent users from accessing the project. Note for clients with the VISION Learning Station (VLS): If a project is linked to a VLS Organization, you will not be able to disable the project until it is unlinked from that organization. To learn more, see "Assign VDM Projects to an Organization" in the VISION Learning Station Help.
|
•Allow an objective to be linked to multiple analysis items: Typically you would not want to allow this as it is contrary to the SAT method, but you can turn on this option if you need it. •Allow an analysis item to be consolidated in multiple objectives: Typically you would not want to allow this as it is contrary to the SAT method, but you can turn on this option if you need it. •Allow 'Task Change Impact' on Task Workscreen: Makes a feature on Task nodes where you can enter the consequences to qualified personnel if the task changes required. The feature will be present and useable regardless, this option determines whether the feature will be required. |
•Allow Multiple Choice questions to be configured for multiple selection: Enable the use of multiple selection Multiple Choice questions, where more than once choice can be correct in a Multiple Choice question. •Allow direct linking of questions to Skill/Knowledge items: Typically you would not want to allow this as it is contrary to the SAT method, but you can turn on this option if you need it. •Allow exams to include questions that have no objectives: Typically you would not want to allow this as it is contrary to the SAT method, but you can turn on this option if you need it. •Auto display question statistics: Automatically show the question statistics when visiting the Stats page on a question workscreen. Uncheck this box if showing the statistics takes too long or slows down the system for other users. With this box unchecked, statistics won't display automatically, but will still be available through buttons on the Stats page |
•Script files for generating VISION system documents: Use this interface to select which script files VISION will use to generate different documents. To change a script file, first select the document from the "Generate this document..." menu and then click the Change button to brows for a different report script file. The other script needs to be located in the VISION "Reports\System" folder, or in some folder descending from that one. You can choose a different base folder for reports on the main "Folders" tab. oThe the Default button to change back to the default script file for either the selected document or all documents. •Formatted Field Templates: Use this interface to add RTF template files to certain fields in VISION. •"Custom Help" document or web page: This is the document that will open when "Custom help is chosen from the VISION Help menu. This document is something that you or your organization authors. it can be an HTML document, a Word document, etc. You should put the document where it is accessible to all VISION users, such as in a VISION program sub-directory, or on a common network drive. You can also enter a Web address here, but note that this entry is limited to 260 characters in length. •Supplementary spelling dictionary file: This file holds whatever "words" VISION users choose to add to the dictionary during spell-checking. oWhy change the file? One possible reason: VISION users might not have file-write access to the default file, because it is located in the VISION program base directory. Another possible reason: You might want different supplementary dictionaries for different projects. For example, perhaps you have an acronym that you want the spell checker to accept in one project, but treat as a misspelling in other projects. |
•Project Font: View or edit the font and font size for the selected project(s). oFont Name: The name of the project's default font. oSize: The size of the project's default font. oStyle: Whether the project's default font is display in Regular, Italic, Bold, etc. oChange: Click this button to make changes to the default font in the selected project to this font. Note that this won't change the font for any existing data, only new data. oStandard (Aerial 10 point): Revert to VISION's standard font. •Project Labels: A few input fields on the VISION data workscreens have no predefined purpose; you decide what to use them for. Here, you can set the labels for those fields in the selected projects. oWorkscreen Input Field: Select the field you wish to change. oField Label: Enter the label that will be displayed in VISION. Note that an ampersand (&) causes the next character in the label to be underlined in VISION (for keyboard navigation. For example, "Num Field &1" produces "Num Field 1". To make an ampersand appear as an ampersand in VISION, write it twice here (&&). For example, "Apples && Oranges" produces "Apples & Oranges". oReset button: Choose to reset changes made to the currently selected label or reset all labels for the selected project. |
Lists Sub-Tab
This window shows the various lists that are used in VISION. Although you cannot add or delete lists, you can add, delete, and edit the items in some of these lists. Each project has its own version of a list, except for those lists marked by an asterisk (*), which are shared by all projects.
To view or edit the items in a list, double-click on a list, or click the "Edit List" button.
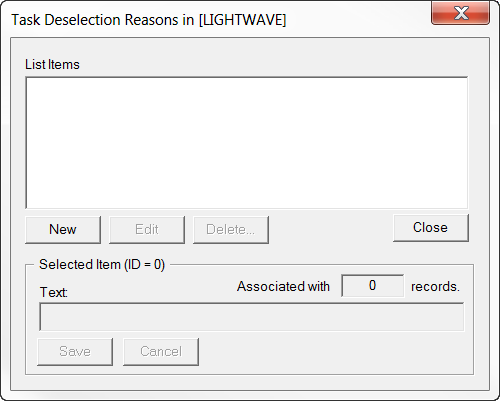
Edit List Interface
•New: Click this button to enter a new item in the "Text" field. •Edit: Click this button to make changes to the selected list item. •Delete: Click this button to delete the selected list item. •Close: Close this window. •Associated with _ records: The number of records in the project currently using items from this list. •Text: Enter or edit the text of the list item. You must click the New or Edit buttons before you can enter or change any text here. •Save: Keep the new list item or your changes to an existing list item. •Cancel: Erase your changes in the Text field. This will not close the window. Selected Project
•Name: Name of the highlighted project. •System ID: Unique system-generated ID of the highlighted project. •Description: Any information entered for the project. •Lock button: Click this button to set a password for this project. |
Folders Tab
These folders apply all projects. Relative paths are relative to the location of VISION.EXE. The default folder locations are acceptable when there is a single installation of VISION.EXE that everyone shares.
If, however, your organization uses multiple installations of VISION.EXE, then you should not use the default folder locations, because then each installation of VISION.EXE would have its own set of these folders to maintain. Instead, you should these folder paths to common network locations accessible to all VISION users, so that everybody shares the same files for reports, linked pictures, and so on.
•"Default" Buttons: The "Default" buttons are enabled only where the folder differs from the default value.
•Coloring: Pending changes are highlighted. Non-default folder values are lightly highlighted.
•"Projects" tab, "Files" Subtab: A couple of these folders (Reports and Spell-Check) represent the base folders for the files identified on the "Projects" tab, "Files" sub-tab.
•Personalized Locations: A VISION user can override any of these folder locations, for themselves only, through the Preferences window in VISION.
Tools Tab
This tab displays a list of VISION data objects that are currently locked.
What is a lock?
Normally, locked just means an object is being edited (its workscreen is open). The lock prevents others from editing the same object at the same time. That lock will get released when the editing session ends. Then the object becomes available to be edited again. You should not interfere with a normal lock.
Stuck Locks
After an abnormal event, such as an application crash, a lock might not get released, leaving a data object stuck in a locked state. That object will not be editable again until the lock is manually released. Here is one place where you can manually unlock a locked data object.
Identifying Stuck Locks
In the list, there is no certain way to distinguish normal locks from abnormal (stuck) ones. But the duration is a clue. A lock that has lasted for hours or days might be a stuck lock.
Releasing a Lock
You can release any lock by selecting it in the list and clicking the Unlock Selection button or by right-clicking on the row and selecting Unlock from the popup menu.
Columns
Click the column headers to sort by that column, or drag them to change their size or order.
•Data Type: The type of object that is locked.
•Data ID: The unique system ID of the locked object.
•Locked By: The user who holds the lock on this data object.
•Locked At: The time at which the object was locked.
•Locked For: The amount of time that the object has been locked for.
Unlock Selection Button
Highlight the data object you wish to unlock and then click this button to unlock it. You can also right-click on the data object and select "Unlock" to unlock it.