Use the VISION Content Toolbar to create the document. This section discusses the following features in the VISION Content Toolbar:
Introduction
Heading & Body Styles
Formatting Text
Inserting Graphic Elements
Inserting Notes
Activities & Additional Notes
 Remember to match your template to the type of document you wish to produce.
Introduction
The VISION Content Toolbar (VCT) provides the instructor the ability to select special templates for the content object if needed, apply formatting and organize content consistent with the VOR template, and insert notes and other special document elements to enhance the training material. Using the VCT when developing content objects allows the content objects to be automatically assembled into outcomes by the VISION Outcomes Report (VOR) without requiring the instructor to manually edit outcome documents.
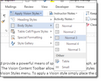
VISION Content Tool in Microsoft Word
VISION Content Tool in Microsoft PowerPoint

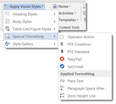
Heading & Body Styles
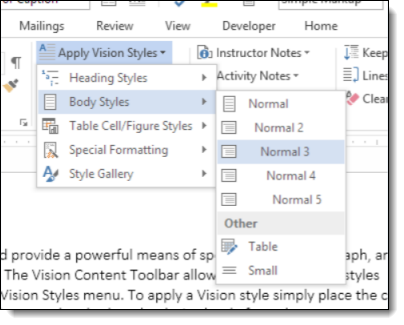
Styles in Microsoft Word provide a powerful means of specifying font, paragraph, and list or number formatting. The VISION Content Toolbar allows the application of styles quickly using the Apply VISION Styles menu. To apply a VISION style, place the cursor in the paragraph to be formatted and select the desired style from the menu.
The Heading and Body Styles provided by the VCT are designed to work together to allow the instructor to give structure to the content for easier comprehension by the learner. The VCT provides for five levels of Headings with a corresponding Normal (body) style for each level.
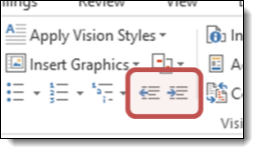
Once a Heading or Body style is applied the Indent Increase and Indent Decrease buttons on the VCT can be used to move the selected paragraph(s) to the left or right. The Clear Formatting button may be used to convert Heading-formatted text to Body text. Both the Indent and Clear Formatting buttons may be used with any VISION style.

When creating content for learning objects, refrain from using the top-level Heading style (e.g., Heading 1). The VOR automatically generates headings for each top-level objective using the top-level heading style and the objective's Topic, (or Behavior if there is not Topic). The top-level Heading style should only be used in the Program Introduction or certain types of media objects.
 Content Auto-Indent
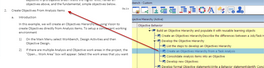
The VOR can automatically format content to reflect the organization of the objectives in the Objective Hierarchy. If this feature is enabled at your site (by your VISION Administrator), all objective content is automatically indented to the appropriate Heading/Body level in the outcome document.
The VOR processes the Objective Hierarchy to identify the subordinate relationships of the objectives sequenced into the TU. The VOR then assigns a level (number 0-4) based on each objective's degree of subordination to the terminal objective(s) of the TU, or any other terminal objective if the objective is part of a different hierarchy.
The use of the Content Auto-Indent feature allows the content of a learning object to be used in any training unit without concern for its appearance in the outcome. The only special requirement for using this feature is that the objective be shared into the Objective Hierarchy branch below the terminal objective of each training unit the objective is re-used in.
When using this feature all content should be formatted starting at the second Heading/Body level. The VOR will automatically indent the content when generating the outcome to reflect the objective's depth on the Objective Hierarchy relative to the training unit's terminal objective.
Example
The content for the selected objective is automatically reformatted and indented in the outcome.
|
Formatting Text
Many of the normal formatting controls available in Word have limited functionality or are restricted by the VISION Content Toolbar. This is done to ensure consistent formatting of all content stored in VISION. This section will discuss the Word formatting features that are available and features added by the VCT.
Font And Paragraph Formatting
The normal Font and Paragraph formatting controls on the Microsoft Word Ribbon are simplified by the VISION Content Toolbar. The available controls allow you to arrange and emphasize text.
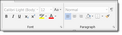
The full Font and Paragraph controls remain available through use of the Open Dialog buttons on the Font and Paragraph groups on the Ribbon. These buttons open the normal Font and Paragraph dialog boxes to allow you to apply more advanced formatting. The Open Dialog button on the VISION Content Toolbar group opens the Styles pane to allow you to apply any style available in the VCT template.
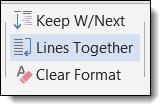
Three additional Paragraph formatting tools are provided by the VCT. The first two controls set the Paragraph Keep With Next and Keep Lines Together attributes for the selected paragraph(s).

Clear Format restores the base font and paragraph formatting to the paragraph's applied style. It also resets the style of the selected paragraph(s) to Body text at the appropriate level or for table cells to the normal table cell style.
In addition to these controls, a duplicate of the default Home tab may be available at the end of the Ribbon depending on how the VCT is setup at your site.
|
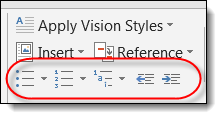
The VISION Content Toolbar includes bullet, numbered, or multi-level outline lists. To create a list, position the cursor and press the corresponding button on the VCT. The VCT analyzes the text and will attempt to determine the appropriate indentation to apply.

The drop-downs may be used to select the desired level directly. The Indent raise and lower buttons will adjust the list level of the selected paragraph(s) as well.
To turn off list formatting for one or more paragraphs, select the paragraph(s) and press the corresponding button on the VCT. Alternatively, the Clear Format button may be used as well.
It is preferable to use the VISION heading styles when creating structured content, as this way numbering will be reset correctly throughout the document. Numbered lists should be reserved for when you cannot use a heading style.
|
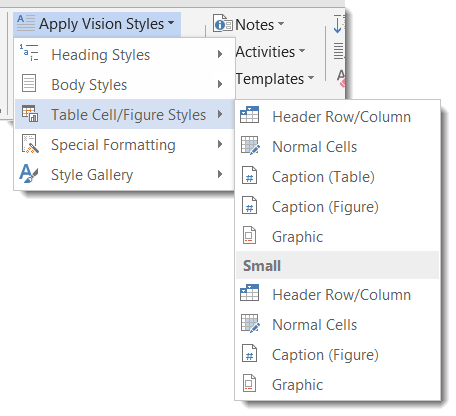
The VISION Content Toolbar uses Styles to format the contents of Tables, graphics and the associated captions.
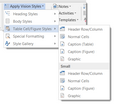
Two Table styles are provided, one for header rows/columns and one for cells containing regular text/data, in Normal and Small font sizes. When Tables are inserted using the VCT command (discussed later) the style for Normal Cells is applied to the entire table. Also, the default VISION table style allows use of Word's built in Table Design and Layout tools for formatting.
The Graphic style provided on the VCT style menu is for use in special circumstances where the VCT commands for inserting figures are not sufficient (e.g., including multiple graphics as part of one "Figure").
|
•Document Elements: The VCT provides direct access to the Operator Action style, which can be used to create placekeeping style checklists, as well as the styles used to insert special elements in PTE, Qualification and JPM content templates. •Plain Text: This style applies a non-proportional font to the selected text or paragraph. This is useful for including computer-generated outputs or tabular data. •Paragraph Spacing: The VCT provides two special styles to control the amount of white space after document elements (e.g., tables) in lieu of manually adjusting paragraph formatting. Paragraph Space After creates the white space normally following Body text, while Zero-Height Line removes white space. •Landscape Content: The VOR can process content in landscape orientation, if formatted properly. To display content in landscape orientation, insert a Word section break before the landscape content. This creates at least two Word sections in the document. The first section must be in portrait orientation and may contain content, if desired. The second section will be in landscape orientation. An additional section break may be inserted after the landscape content if more content in portrait orientation needs to be included. |
Inserting Graphic Elements
The VISION Content Toolbar provides features for inserting graphics, tables and other document elements in Microsoft Word content. These can be inserted in-line in the content or attached to the document.
Inserting Graphics into Content
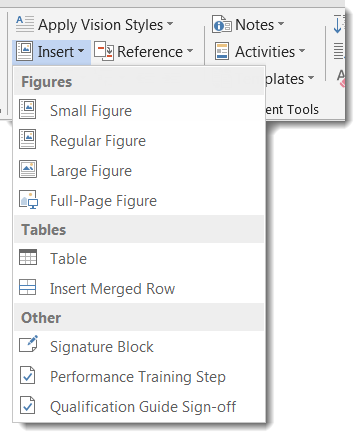
To insert any of the graphic elements available through the VCT, place the cursor in the desired location and select the element from the menu. If you place the cursor is in the middle of a paragraph, the graphic will appear immediately after the paragraph.
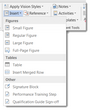
Four sizes of Figures are available:
•The Small Figure inserts a small frame on the right of the page to hold a graphic. •The Regular Figure is as wide as the text area of the outcome document. •The Large Figure provides space for a full page-width graphic. •The Full-Page Figure places the graphic at the top of its own page. When a Figure is selected from the menu, the VCT prompts for a graphics file to insert. Next the VCT will ask if you want a caption, and if you add a caption the VCT will also insert a code that will create a sequential number for the figure in the final document.
When a Table is selected, the VCT first asks if a caption is desired. A field code for the sequential table number is inserted as for figures. The VCT then prompts for the size of the table and the table column AutoFit behavior.
|
Steps to Attach Full-Page Graphics or Table
The Training Outcomes VOR has the capability to attach full-page tables, figures and pictures to the outcome document.
1.To attach a full-page graphic to an outcome, create a new Objective node in VISION Developer. 2.Enter the caption for the graphic in the objective’s Behavior field. 3.On the objective’s Training page, select the desired type of object on the Training Media drop-down list. 4.Place the table or graphic in the Word content in the objective. 5.Use the VCT Insert Graphics → Full-Page Figure to insert full-page figures or pictures or the Insert Graphics → Table command to insert a table. Do not include a caption. It will be written by the VOR when the outcome is generated. |
Other Document Elements
The Signature Block command inserts a place for a signature into the document at the selected location. The Performance Training Step inserts the sign-off for an instance of OJT/TPE.
|
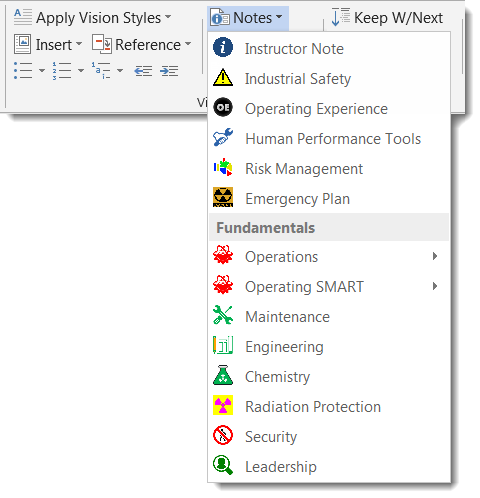
Inserting Notes
The VISION Content Toolbar provides support for inserting a wide variety of Notes into content, in both Word and PowerPoint. The Notes and associated VCT menu(s) are specific to your site's VISION installation so the Notes available to you, the layout of the VCT Notes menu(s), and the appearance of the Notes may differ from those shown in the examples below.
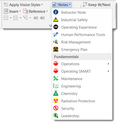
Notes are inserted into content by selecting the desired Note from the Instructor Notes menu When the Note is inserted default text is included to provide guidance to the instructor on the content of the note. In Word the location of the Note depends on where the cursor is positioned:
•When the cursor is in an empty paragraph the Note replaces the current paragraph.
•When the cursor is at the beginning or middle of a paragraph the Note is inserted before the paragraph.
•When the cursor is at the end of a paragraph the Note is inserted after the paragraph.
•In table-based layouts, the performance training items will be inserted in the appropriate column specified for that layout.
•Notes that are designated as "Instructor Notes" will be removed from the Student Guide, if one is generated. These typically include: Instructor Notes, Instructor Activity, and Instructor Cue.
Note Formats
The format of the Note inserted by the VCT will depend upon the layout of the content template in use. Not all layouts may be available in your VISION installation. The VCT has note formats for the following types of layouts:
•Normal (single-column) •Multi-column, table-based •Multi-column, frame-based |
Note Sizes
When inserting notes in Multi-column layouts, two sizes are available, but by default a regular-sized note is inserted.
For frame-based layouts the VCT will ask if a large note is desired. In table-based layouts a large note can be inserted if the cursor is placed in a merged row (table row with all cells merged into one). The Insert Merged Row command on the Insert Graphics menu inserts a merged row above the current row.
|
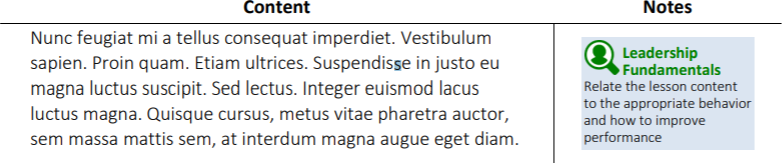
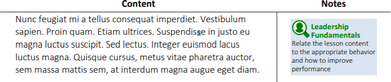
Note Examples
Examples of each size of Note are shown below. Also, some Notes may only be inserted at regular size, as determined by your site.
Normal, Multi-Column Large

Multi-Column, Small
|
PowerPoint Notes
In PowerPoint notes are inserted at a fixed location but can be moved on the slide. The size and placement of the note elements can be adjusted as needed once the note has been inserted.
|
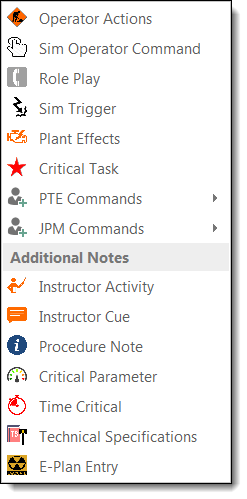
Activity Notes & Additional Notes
Performance training materials may require special document elements related to instructor activities, interaction with the trainee, and operation of training simulators.
The VISION Content Toolbar provides special "Activity" notes for working with performance training materials in Word. Place your cursor where you would like the note to go and then select it from the Activities menu.
 The content layout templates and associated VCT menu(s) are specific to your VISION installation.
Trainee Actions
The Trainee Actions item is used when the expected actions of a trainee are to be listed. If configured at your site this can include a drop-down list of the crew positions responsible for an action.
|
Role Play
The Role Play is a special form of Note that includes two areas for content. The first describes under what conditions a communication to the trainee is to be made. The second specifies the quoted content of the communication.
|
Sim Trigger
The Sim Trigger is used to indicate when the simulator operator is to activate a feature of the training simulator. This command inserts a sequential number field for the trigger number. When the scenario outcome document is compiled all simulator events are numbered sequentially throughout the document.
In the example provided the Sim Trigger command has been used after the Sim Operator Command function.
The preparer of the scenario must be sure to update any simulator programming files listed separately in the outcome or contained on the training simulator to match the numbers assigned by the VOR when the outcome is generated.
|
Plant Effects
This command inserts a specially formatted note (Figure 20) that allows the scenario developer to describe the effects of a simulated malfunction.
|
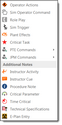
PTE Commands
These commands are used to work with the specialized content templates unique to PTE outcomes. The Conditions and Standards commands are used to insert those elements of a PTE step. The PTE Level is used to set the performance level of the step (e.g., Perform, Simulate, Discuss). An example of a PTE step is shown below:
|
|
|
|
|
Eval
|
Objective
|
Task performance Table
|
Level
|
Train
|
Sat
|
Unsat
|
Condition
Morbi in ipsum sit amet pede facilisis laoreet. Donec lacus nunc, viverra nec, blandit vel, egestas et, augue
|
2.a(3)(i)
|
Vestibulum tincidunt malesuada tellus. Ut ultrices enim.
•Curabitur sit amet mauris. •Morbi in dui quis est pulvinar ullamcorper. Standard
Nulla facilisi. Integer lacinia sollicitudin massa. Cras metus. Sed aliquet risus a tortor. Integer id quam. Morbi mi.
|
P S
|
|
|
|
JPM Commands
These commands are used to work with the specialized content templates unique to JPM outcomes. The Alternate Path and Procedure Note commands insert Notes. The Critical Step command toggles the designation of the step. The Instructor Cue and Time Critical notes are also used frequently in JPMs. An example of JPM steps is shown below.
|
Step
|
Element
|
Standard
|
Sat/Unsat
|
Comments
|
3.
|
Morbi in ipsum sit amet pede facilisis laoreet.
Integer lacinia sollicitudin massa.
|
Donec lacus nunc, viverra nec, blandit vel, egestas et, augue.
•Vestibulum tincidunt malesuada tellus. •Ut ultrices enim. |
S/U
|
|