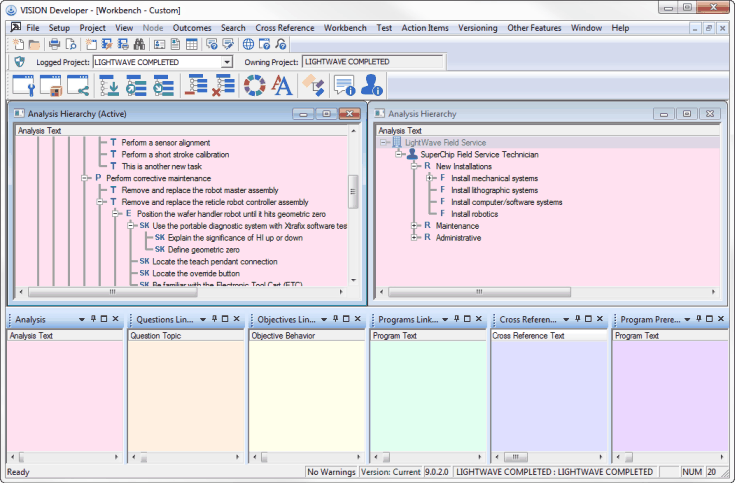
The VISION Workbench is designed to help you carry out instructional analysis and design activities from a hierarchy perspective. Any Workbench can contain one or more hierarchies. A Workbench display is divided into two areas: the Hierarchy area, and the Links window along the bottom. You can resize either region by dragging the separator bar (the solid horizontal bar that spans the width of the entire Workbench window) up or down as desired. You can also detach, or undock, the links windows from their default locations.

The Workbench Toolbar
The workbench toolbar is located across the top of the VISION Workbench. These menu items are only visible when the workbench is displayed.
 Open Analysis Work Area (Alt + A)
Opens an Analysis work area in the Workbench. If you have more than one Analysis Work Area defined for the project in which you are working, you will be prompted to choose which Work Area you would like to open.
 Open Objective Work Area (Alt + 0)
Opens an Objective work area in the Workbench. If you have more than one Objective Work Area defined for the project in which you are working, you will be prompted to choose which Work Area you would like to open.
 Open Program Work Area (Alt + P)
Opens a Program work area in the Workbench. If you have more than one Program Work Area defined for the project in which you are working, you will be prompted to choose the Work Area you would like to open.
 Insert Last Child (Insert)
Inserts a new node as the Last Child under the selected node in the active hierarchy window. VISION will suggest a level based on the selected node's level.
 Insert Sibling Above (Alt+Insert)
Inserts a new node as a Sibling Above (at the same level as, but before) the selected node in the active hierarchy window. VISION will suggest a level based on the selected node's level.
 Insert Sibling Below (Ctrl+Insert)
Inserts a new node as a Sibling Below (at the same level as, but after) the selected node in the active hierarchy window. VISION will suggest a level based on the selected node's level (except for the Program hierarchy, where the Level can be changed on the node's General page).
 Unlink Branch
Unlink all selected branches from the active hierarchy window. If a branch is not shared, it is unlinked from its parent and moved to the Recycle Bin. If a branch is shared, it is only unlinked from its parent, but not moved to the Recycle Bin, because it still appears elsewhere in the hierarchy. VISION displays a dialog box where you can confirm the unlinking of each selected branch.
 Delete Branch
Permanently deletes the nodes selected in the active hierarchy window, along with their descendants. VISION displays a dialog box where you can confirm the deletion of each selected node. When a node is deleted, all subordinate nodes (descendants) are also deleted. However, any node that has more than one parent is NOT deleted.
 Color Attributes
Shows the Color Attributes control for the active hierarchy window. The Color Attributes control enables you to assign colors to the hierarchy components according to selected attributes.
 Change Workbench Font
Changes the font in all of the Workbench windows. This operation affects all windows in the Workbench. This makes no change to the actual data, but just to the way it’s presented in these windows.
 Show FlowChart
Shows a diagram illustrating the connections (links) between the active hierarchy node and other data objects.
 Show Steps
Shows the Cue Card for the work area that is open. A Cue Card is a help window that lists the steps for performing the activity for a particular work area (Analysis, Objectives, Program).
 Show Instructional Advisor
Shows the Advisor help screen. The Advisor provides instructional advice, tips, and examples directly related to an activity for a particular work area (Analysis, Objectives, Program).
The Hierarchy Window
The Hierarchy area of the Workbench displays all hierarchy windows that are open in the Workbench. You will specify which types of hierarchy windows to open and you can view hierarchies from different projects in the same Workbench. Here is an example of how you can open several work areas within one project to view how the instructional design components are linked. The three types of hierarchies – Analysis, Objective, and Program – are shown in the illustration.
 The terms "work area" and "hierarchy" are often used interchangeably. At times, you will be asked to open an Analysis Hierarchy, for example. Upon doing so, you will be presented with a window asking you to select an Analysis Work Area. A work area is named or identified by the highest node (also referred to as the root node) in the hierarchy representing the work area.
Here is an example of how you can open two work areas within two different projects. Both of the hierarchies shown in the illustration are Analysis hierarchies.
Analysis Hierarchy
The Analysis Hierarchy is where you build and maintain your job and task analysis. You can also create objectives from the Analysis Hierarchy. Analysis activities include:
•Performing and editing a job analysis
•Determining task criticality by analyzing hazards
•Selecting tasks for training and retraining
•Performing and editing a task analysis
Analysis Hierarchy Assistant
The Analysis Hierarchy Assistant is used to build a hierarchy structure quickly and efficiently. With the Assistant, you can enter the text of your components and select the level you prefer. It is not necessary to use the Assistant; the ordinary hierarchy insert operations accomplish the same thing. But it is quicker to use the Assistant, especially when you need to create many hierarchy nodes.
•To open the Analysis Hierarchy Assistant from the Analysis Hierarchy, select Node and then Analysis Assistant from the Main Menu. Alternatively, you can click your right mouse button and select Insert With Assistant from the menu.
•The level of hierarchy node is set by the Assistant based upon the level of the selected parent node, but you can change the level by using the arrow keys to scroll through the list of levels. Once selected, click the Add Last Child as button to add the node to the hierarchy.
•Click the Advisor button for advice on the level selected at the left.
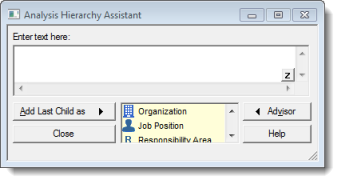
The Assistant will initially appear on top of the hierarchy. If it slips beneath the hierarchy, it can be recovered from the Window menu or the Node menu.
Objectives Hierarchy
The Objectives Hierarchy is a structure that shows the terminal and enabling objectives in the context of their prerequisite relationships. Think of it as a framework, or a kind of architecture that organizes the individual parts with respect to each other. An Objectives Hierarchy has the terminal or higher-level objectives at the top, and the prerequisite, enabling objectives under them. On the very bottom of the Objectives Hierarchy are the basic, fundamental objectives. This means that the first things to be learned are at the bottom, and the final things to be accomplished are at the top of the hierarchy.
Program Hierarchy
The Program Hierarchy is where you organize a training program structure using level names such as courses, modules, lessons, and segments. It is also where you sequence (or assign) objectives into the structure and develop content for the sequenced objectives. The program level names are purely symbolic. VISION primarily distinguishes between two different types of program units: training units and those that are not training units. The training unit is always the lowest level of a program structure. A program unit that is not a training unit is simply treated as an organizer that is above a training unit in the Program Hierarchy window.
Opening a Work Area
To open a hierarchy from the Main Menu, select Workbench. Then select the Workbench that contains the activity you want to perform.
If you are already in a Workbench and you want to open another work area, click one of the following buttons in the Workbench Toolbar:
|
Open an Analysis work area |
|
Open an Objectives work area |
|
Open a Program work area |
If the Auto Resize Hierarchy Windows menu option is toggled "on" under the Workbench menu (when a Workbench is open), VISION will automatically resize the hierarchy windows if you reposition the separator bar or if you change the size of the Workbench window.