|
Navigation: VISION Developer Help > Getting Started Updating VISION from a document |
Scroll Prev Top Next More |
While the ordinary means of entering or modifying data in the VISION database is through entering values into the object properties, cross-reference tables, and the workscreen hierarchies, VISION can also accept database changes from a report or document that has been edited outside of VISION. This is accomplished using the Update Database tool, which can be found under the Tools heading of the Documents Main Menu. Note that the Tools item does not appear in the Main Menu unless a RTF document has been opened from within VISION Developer.
How it works
Initially, all data in VISION will be populated by a data conversion, project import, or through manual entry by a VISION user. Once the database is set up, users can produce outcomes in the form of reports or documents. Reports and Documents include the Master Task List, Task to Training Matrix, Question Bank, etc. These documents can be saved to a computer, and distributed electronically to others within the training department, SMEs, etc, who may may make edits. The RTF document can then be sent to a VISION user, and opened in VISION from the Main Menu File > Open option, or Main Menu toolbar Open File icon.
Once the edited document is open, the Main Menu will change to display RTF document editing options rather than those used in the Workbench. To update VISION with changes made to the RTF document, select Tools from the Main Menu, and then select Update Database to open the utility.
How it works is explained in further detail below.

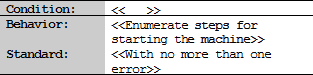
The active document may contain text segments that correspond to particular fields in particular database objects. For example, the active document may contain a segment corresponding to the Behavior field in learning objective 1234. Indeed, the document may contain all the content fields for numerous objectives. These content fields in the document might be newer, improved versions of their counterparts in the database. Rather than hunt and peck your way through the database, manually updating each field one by one, you can use the Update Database tool to transfer the newer, improved fields from the document into the database—in one stroke. Why Would a Field be Newer?Why might the fields in the document be newer, improved versions of their database counterparts? Well, consider this workflow process: 1.A document is generated in VISION, by running a report. The document includes the contents of various fields from various VISION data objects, for instance, the objective content fields for all objectives in a particular lesson. If some or all of those fields are presently empty, the document shows placeholders indicating where the content from those fields would appear. The document is saved to an RTF file. 2.Next, this RTF document is handed off to somebody, perhaps an instructor or subject-matter expert (SME), who edits the document. That editing can be done outside VISION in a program like MS Word. The instructor or SME revises or fills in the data fields in the document and saves the changes to the original RTF file. 3.Finally, the revised RTF document is reopened in VISION. The fields in the document now are newer, improved versions of the database fields that they originated from. The object now is to update those original database fields with the newer content from the document. Because the document fields are marked (by means of hidden text identifiers), the Update Database tool knows which data fields they correspond to, and can update those fields. AdvantagesIn this way, training content can be developed outside VISION, through a document-style interface. Two advantages arise from this: 1.The author does not need to know how to use VISION, or even have access to it. 2.The authoring can be done in a text editor superior to VISION's internal text editor, such as Microsoft Word. Among other things, this permits the convenience of using macros in developing content. Field ParticipationWhich fields in the document participate in the update (or highlight) action? That is controlled by several settings: •First, the participation is limited to the chosen document portion. •Within the chosen portion, participation is further limited to fields of the type specified by the checkbox selections. •If the Only <<X>> Marking Specific FieldsYou might choose to select specific kinds of nodes or a specific section of the document to highlight or update. Why would some fields be marked, but not others?By default, the field "anchors" — << and >> — are not visible in a VISION-generated document. However, the active document may have been generated by a VISION report that is expressly designed for the purpose of updating the database. Such a report may have exposed the normally hidden field anchors for some fields, while leaving them hidden everywhere else. The report has exposed the markers in order to identify and draw attention to those fields that the user is encouraged to fill in or improve. By checking the Only <<x>> Why restrict the update to marked fields only?A VISION-generated document may include many fields from the database, of which only some have likely been improved by the document user, after the document generation. Excluding unmarked fields improves the efficiency of the update by ignoring fields in the document that do correspond to actual data fields, but that the document user probably hasn't changed. Efficiency, however, is not the only purpose: preventing errors is another. Imagine a report that shows the same field more than once. Consider the following document excerpt, for example: 3.1. Enumerate steps for starting the machine
In this example, notice that the objective behavior statement ("Enumerate steps ...") is shown twice for the same objective. If the document user changes the first instance of the behavior and then proceeds to update the database, the change will not be made. Why? Because after updating the database with the revised first instance, the update then proceeds to update the same field again—with the second instance, which has not changed. Because it is associated with the same data field, the second update overwrites the first. Notice, however, that in this excerpt, the second instance of the behavior is marked, but not the first. This is an aid to the document user, to prevent just that kind of overwrite mistake that could occur. If the document user is careful to update only the marked fields, and if the update is done with the Only <<x>> |

Selecting Update Database from the Tools menu opens the utility window to the left of the open document. From this window you will select the options described in the section below.
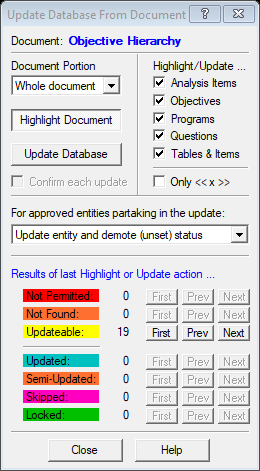
Update Workscreen ComponentsTo get help on specific parts of the Update Database workscreen, click the button and then drag and drop the floating question mark onto a part of the workscreen. DocumentThis is the window title of the document that the Update tool is currently associated with. To associate the tool with another document, first select the other document and then repeat the menu command Tools Document PortionThe document portion is one of the ways for controlling the field participation. Do you want to draw fields from anywhere in the document, or from just part of the document? Choose the desired portion: •Whole document: Use fields from anywhere in the document. •Selection: Use fields found only within the currently selected text in the document, or only that field on which the cursor is currently positioned (if no text is selected). •Start to cursor: Use fields found only between the start of the document and the current cursor position. •Cursor to end: Use fields found only between the current cursor position and the end of the document. Highlight Document ButtonClick the Highlight Document button to highlight the segments of the document that would participate in an update operation, according to the chosen document portion and checkbox settings. (See Field Participation.) The point of highlighting is to see, without actually doing an update, what would get updated. You don't have to highlight the document before doing an update; you can proceed directly to the update, if desired. Highlighting uses different colors to signify different statuses for the data-associated fields in the document.
Once the document is highlighted, the results section of the Update Database workscreen shows the number of instances of document segments in each of the above categories. The results section also provides buttons for navigating among those instances. Note: The highlighting is only temporary; it is not a permanent change to the document. To remove the highlighting, simply click the Highlight button again, or close the Update Database workscreen. Update Database ButtonClick the Update Database button to invoke the update, which consists of the transfer of document segments to the actual database fields that they correspond to. (That correspondence is known by virtue of hidden identifiers preceding the segments.) The segments from the document replace the corresponding data fields. Updating, like highlighting, uses different colors to signify the results of the update. The coloring is applied to the document segments that participated in the update. •Confirm Each Update: When this box is checked, the Update Database operation will pause before each update, for you to proceed with, or skip, that data field update. Highlight/UpdateUse these checkboxes to specify which kinds of data fields are to participate in the next Highlight or Update action. Additionally, you can check Marked Fields Only Approved EntitiesAn approved entity is one that is currently in a "finished" status. Here you can choose what should happen to approved objects when you click Update Database. •Do not update: Skip approved objects. Don't update them; don't even highlight them. •Update entity and demote status: Do update approved entities, but take them out of the approved state by setting their status to "none". •Update entity and keep approved status: Treat approved entities the same as non-approved entities. Update them and do NOT demote their status; leave them approved. Results of Highlight or Update OperationThis section summarizes the last highlight or update operation. It shows how many document fields (meeting the field selection criteria specified in the upper section of the workscreen) fell into each category, or status. The First, Prev and Next •Statuses of Document Fields: After a highlight or update operation, the document fields are temporarily color-coded according to their status. •Number of Instances: In the chosen document portion, and with the chosen field selection criteria, the quantity of those fields in the document that have the status described at left (Not Permitted, Not Found, etc.). •First Instance: Go to the first instance in the document of the field having the status described at left. •Previous Instance: From where the cursor is now positioned in the document, go backward to the nearest instance in the document of the field having the status described at left. •Next Instance: From where the cursor is now positioned in the document, go forward to the next instance in the document of the field having the status described at left. |


 buttons can be used to navigate through the document to the field locations.