There are several common features of VISION's web module display:
Login Options
We provide two different ways to log into the VISION Learning Station, VLS SSO (Single Sign On) and Identity Provider Login.
VLS SSO
This type of login verifies user's identities with their network and VISION's database. VLS SSO users will skip the login page entirely.
Identity Provider Login
This type of login allows users to login directly with a VISION username and password, through external identity providers like Active Directory or Office 365, or via social networks like LinkedIn or Facebook. To set up this type of authentication please see our VISION Learning Station Installation Guide or email support at support@focuslearning.com.
The VISION Learning Station and Web Applications Display
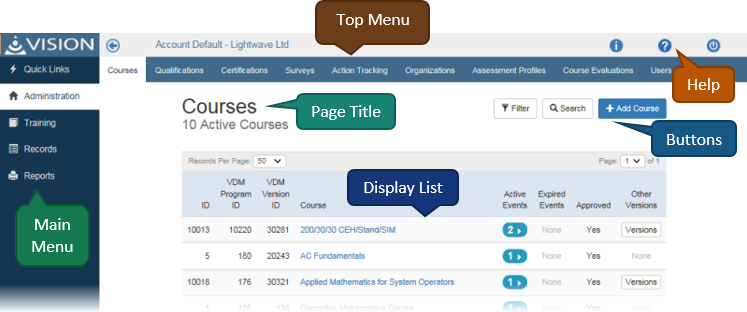
Main Menu
The Main Menu is the first place you will go to navigate in VISION Learning Station. It is always present on the left-hand side of the window.
Top Menu
Tabs along the top of the window further divide each area of VISION Learning Station. Click on a tab to bring up that window.
Page Title
The title of every page can be found in the upper left corner under the Top Menu. It will also have some information regarding the page.
Buttons
Buttons can be found on the top right of most pages. Add, Search, and Filter buttons will always be in this area.
•Search Buttons: The Search button provides a way to find a specific record (or records). The search on the Courses page will be different from the search on the Action Tracking page. Note that searches performed in the Oracle version of VISION Learning Station are case sensitive, while those performed in the SQL version are not.
•Filter Button: Every page will have it's own Filter criteria. This allows you to limit the list of records displayed on the page.
•Back Button: You will frequently find Back buttons on the top left of the page. You can also use Internet Explorer's back button.
•Submit Button: Frequently when you make changes to a record you will need to save them by clicking a Submit button. These can always be found at the bottom right of a record.
Display List
This is a common way that VISION Learning Station displays information in the Administration area. Here, several common features of the display list are explained.
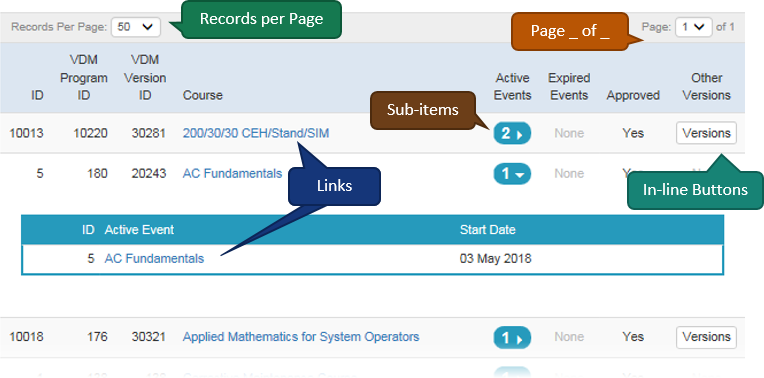
•Records per page: This menu allows you to select how many records to display per page. You can select between 25, 50, 75, 100, 125. The default number of records is 50.
•Page _ of _: This menu displays the page that is being displayed out of the total number of pages. Select a different page by clicking the drop-down menu and selecting a different page.
•Links: In all of these lists, you will find blue links that will open the properties page for the items listed.
•Number of Sub-items: Some lists will display a number of sub-records associated with records on the list. For example, the list of courses shows the number of active and archived course events associated with the course. Click the white down arrow next to the number of related records to see links for those as well.
•In-line Buttons: Sometimes you will find specialty options in the form of buttons within the list display. Each button will function specifically with the list item it is in line with.
Version Icons
You may come across Version Icons in the VISION Learning Station and Qualification modules, just as you would in the VISION Developer module.
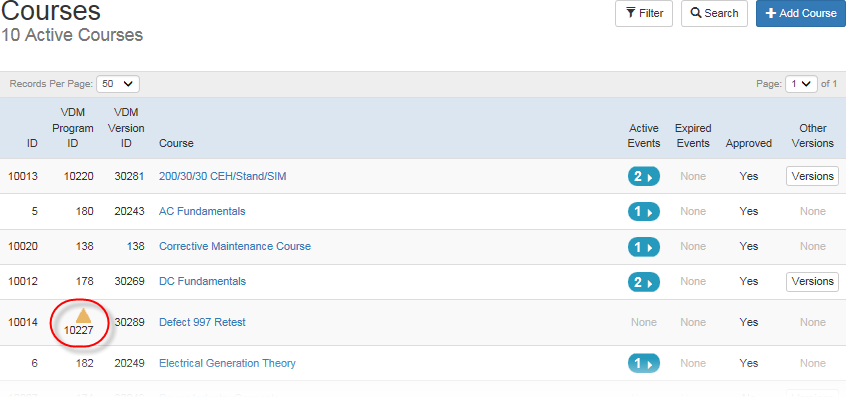
Version Icons appear with the VISION Developer module's Program ID and only appear if a newer APPROVED version of a course or qualification exists in the VISION Developer module.
These are meant to inform you that this is not the latest approved version of the course or qualification so that you can update to the new version if you wish by clicking the Create Version button on the Course or Qualification's properties page.