Below is a list of all menu options under the Paragraph menu. The Paragraph menu option will only appear in the menu when you are working in a document.
 Tip: To get help on any of these commands from VISION, click the Help button
 ![]() and select any command from the menu.
and select any command from the menu.
•Normal: Removes any paragraph formatting (center, right justify, double space, etc.).
•Paragraph Style: Applies a paragraph style to the current paragraph or all of the selected paragraphs. A style is a group of formats that you can apply to a selected text or paragraphs without having to select each format separately.
oTo create a new style or edit an existing one, select Edit ![]() Style from the Main Menu.
Style from the Main Menu.
oStyles apply a consistent formatting to the paragraph of a document. To remove paragraph formatting set by selecting a style, select Paragraph ![]() Normal from the Main Menu.
Normal from the Main Menu.
•Left Justify: Aligns the current paragraph or all selected paragraphs to be flush left against the page margin or the table cell border (if used in a table). This is the default alignment.
•Center: Center (Alt+8) Centers the current paragraph or all selected paragraphs within page margins or table cells (if used in a table). If you select this command again, the Center formatting is removed.
•Right Justify: Right Justify (Alt+9) Aligns the current paragraph or all selected paragraphs to be flush right against the page margin or the table cell border (if used in a table). If you select this command again, Right Justify formatting is removed.
•Justify Both: Aligns the current paragraph or all selected paragraphs to be flush with both the left and right borders of the page or table cell (if used in a table), stretching out the character spacing as needed to achieve this. If you select this command again, Justify Both formatting is removed.
•Double Space: Double-spaces the current paragraph or all of the selected paragraphs. If you select this command again, Double Space formatting is removed.
•Text Flow: Sets the direction of text flow in the current or selected paragraphs: left-to-right or right-to-left. This doesn’t make text go backwards; it does things like putting the bullets on the right side instead of the left.
oChanging the flow direction may be useful if you are writing in a language that is written right-to-left.
o Tip: To set the direction for the whole document, use menu item Edit ![]() Document Text Flow.
Document Text Flow.
•Increase Left Indent: (Alt+L) Increases the indentation of the left side of the current paragraph or all of the selected paragraphs to the next tab stop. To remove indentation, select Paragraph ![]() Normal from the Main Menu.
Normal from the Main Menu.
oTip: You can also drag both of the arrow markers on the left side of the toolbar.
•Increase Right Indent: (Alt+R) Increases the indentation of the right side of the current paragraph or all of the selected paragraphs to the next tab stop. To remove indentation, select Paragraph ![]() Normal from the Main Menu.
Normal from the Main Menu.
oTip: You can also drag the arrow marker on the right side of the toolbar.

•Increase Hanging Indent: Increase the hanging indentation of the current paragraph or all of the selected paragraphs to the next tab stop. "Hanging Indent" indents all lines in the paragraph except for the first line. To remove indentation, select Paragraph ![]() Normal from the Main Menu.
Normal from the Main Menu.
oTip: You can also drag the bottom arrow marker on the left side of the toolbar.
•Keep Together: If Keep Together has a check next to it, the Editor attempts to keep all lines in the paragraph on the same page.
•Keep With Next: If Keep with Next has a check next to it, the Editor attempts to keep the last line of the current paragraph and the first line of the next paragraph on the same page.
•Prevent Widows/Orphans: Prevents the first or last line of a paragraph from appearing by itself on a page. For example, it prevents the last line from getting separated from the rest of the paragraph by a page break.
•Set Tab: Sets tabs for left, right, center and decimal tab stops. You can specify the type of tab stop (left, right, center or decimal) and the tab leader (dot, hyphen or underline) from the "Set a Tab Position" dialog box.
oThe tab stops can also be set for the current paragraph or for all paragraphs in a highlighted block of text using the document ruler. To set the "left" tab, click the left mouse button on the ruler at the desired location. To set the "center" tab, hold the Shift key, and click the left mouse button on the desired location.
oTo move a tab position, click the left mouse button on the tab indicator, and keep the mouse button depressed. While the mouse button is depressed, drag it to the desired location, and then release the mouse button.
•Clear Tab: Clears a specific tab. From the dialog box, choose the specific position to clear from the tab position list.
oTip: You can also clear a tab by dragging the tab symbol off of the ruler.
•Clear All Tabs: Clears all tab stops displayed in the ruler.
•Paragraph Spacing: Sets the spacing before and after a paragraph. You can also specify the minimum space between the lines in the paragraph. All paragraph spacing is specified in points (the same as in MS Word).
•Border and Shading: Draw borders around a paragraph and specify shading for the paragraph.
oNote: If you change the shading percentage and the paragraph does not appear to be shaded or the shading color does not appear to change, select File ![]() Print Preview from the Main Menu. In the Print Preview mode, the shading color will be displayed accurately.
Print Preview from the Main Menu. In the Print Preview mode, the shading color will be displayed accurately.
•Background Color: Sets the background color for the current or selected paragraphs. This is one of several similar, but not identical, color properties.

•Bullet: Bullets (Alt+B) Add bullets to selected paragraphs. Select the type of bullets that you want from the pop-up menu: round, diamond, solid square, hollow square, arrow or check. To remove bullets, select Paragraph ![]() Normal from the Main Menu.
Normal from the Main Menu.
•Numbering: Numbering (Alt+N) Add numbering or lettering in a list. Select the type of numbering or lettering that you want from the pop-up menu: number, upper case letter or lower case letter.
Using the Ruler for Editing Tabs
•The VISION Editor supports left, right, center and decimal tab stops. The tab stops are very useful for aligning text. A paragraph can have as many as 20 tab positions.
•The tab stops can also be created by using the Set Tab selection from the Paragraph menu. This option allows you to specify the tab position, tab type (left, right, center, or decimal) and tab leader (dot, hyphen, underline, or none).
•To move a tab position using the mouse, simply click the left mouse button on the tab symbol on the ruler. While the mouse button is depressed, drag the mouse to the desired location and release the mouse button.
•To clear a tab position, simply click at the desired tab marker and drag it off the ruler, or select Clear Tab from the menu. You can also clear all tab stops for the selected text by selecting Clear All Tabs option from the menu.
•Normally, a tab command is applicable to every line of the current paragraph. However, if you highlight a block of text before initiating a tab command, the tab command is then applicable to all the lines in the highlighted block of text.
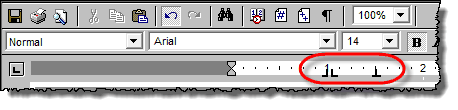
•Left tab stop: The left tab stop begins the text following a tab character at the next tab position. To create a left tab stop, click the left mouse button at the specified location on the ruler. The left tab stop is indicated on the ruler by an arrow with a tail toward the right.
•Right tab stop: The right tab stop aligns the text at the current tab stop such that the text ends at the tab marker. To create a right tab stop, click the right mouse button at the specified location on the ruler. The right tab stop is indicated on the ruler by an arrow with a tail toward the left.
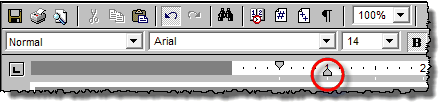
•Center tab stop: The center tab stop centers the text at the current tab position. To create a center tab stop, hold the Shift key and click the left mouse button at the specified location on the ruler. The center tab stop is indicated on the ruler by a straight arrow.
•Decimal tab stop: The decimal tab stop aligns the text at the decimal point. To create a decimal tab stop, hold the Shift key and click the right mouse button at the specified location on the ruler. The decimal tab stop is indicated on the ruler by a dot under a straight arrow.