Linking HTML content to VISION courses requires a few extra steps when you are publishing that content from programs like Articulate or Captivate. There are some publishing settings you may need to adjust, and that you will need to add specifically for VISION.
 Note that this tutorial was written in Articulate Storyline 360, but the steps can be used for Adobe Captivate 2019 as well.
Publish Articulate/Captivate
1.Find the last slide your user should see before receiving credit. If using a knowledge check, the last slide is going to be a “success” slide or slide layer on the Quiz Results slide.
2.Insert a “trigger” on the slide you have identified to be the last.
3.The action should be “Execute JavaScript”
4.Enter:
setTimeout(() => { window.parent.postMessage('customHTMLFinished', '*'); }, "250"); |
5. Note that the above code is case sensitive and must be entered exactly.
a.The when should be “Timeline starts”.
b.The object should be the current slide, typically defaulted to this already.
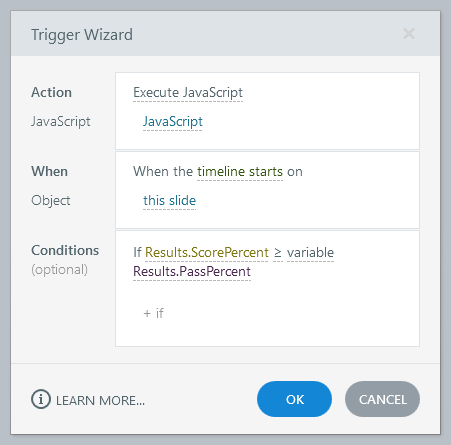
6.In the above example, the JavaScript will fire when the learner lands on the Quiz Results slide, and only if the learner’s score is equal to or greater than the passing score.
7.After you have completed the Articulate module and inserted the trigger on the last slide, publish your project for “Web”.
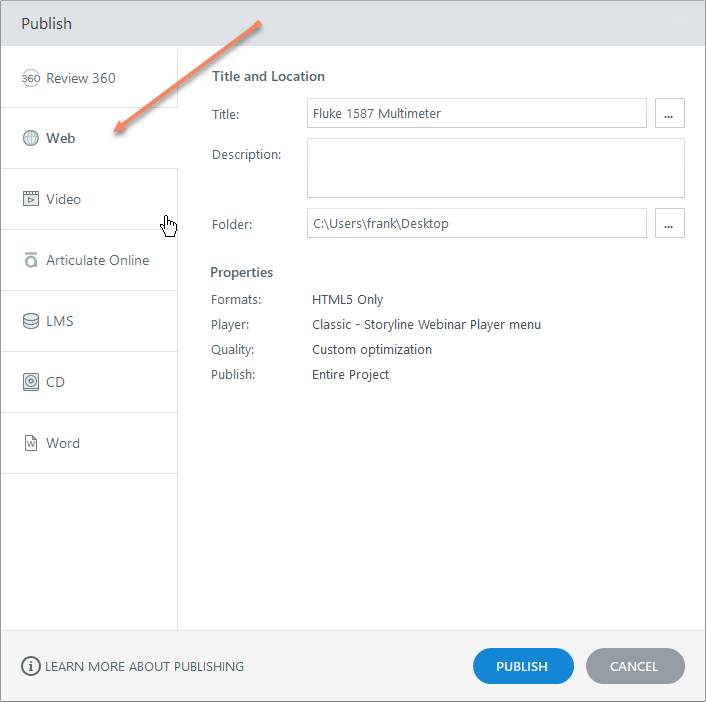
8.Select the Player properties.
9.Optional: If learners are using common computers in lab, disable resume on start:
a.Click Other options.
b.Select Never Resume on Restart.
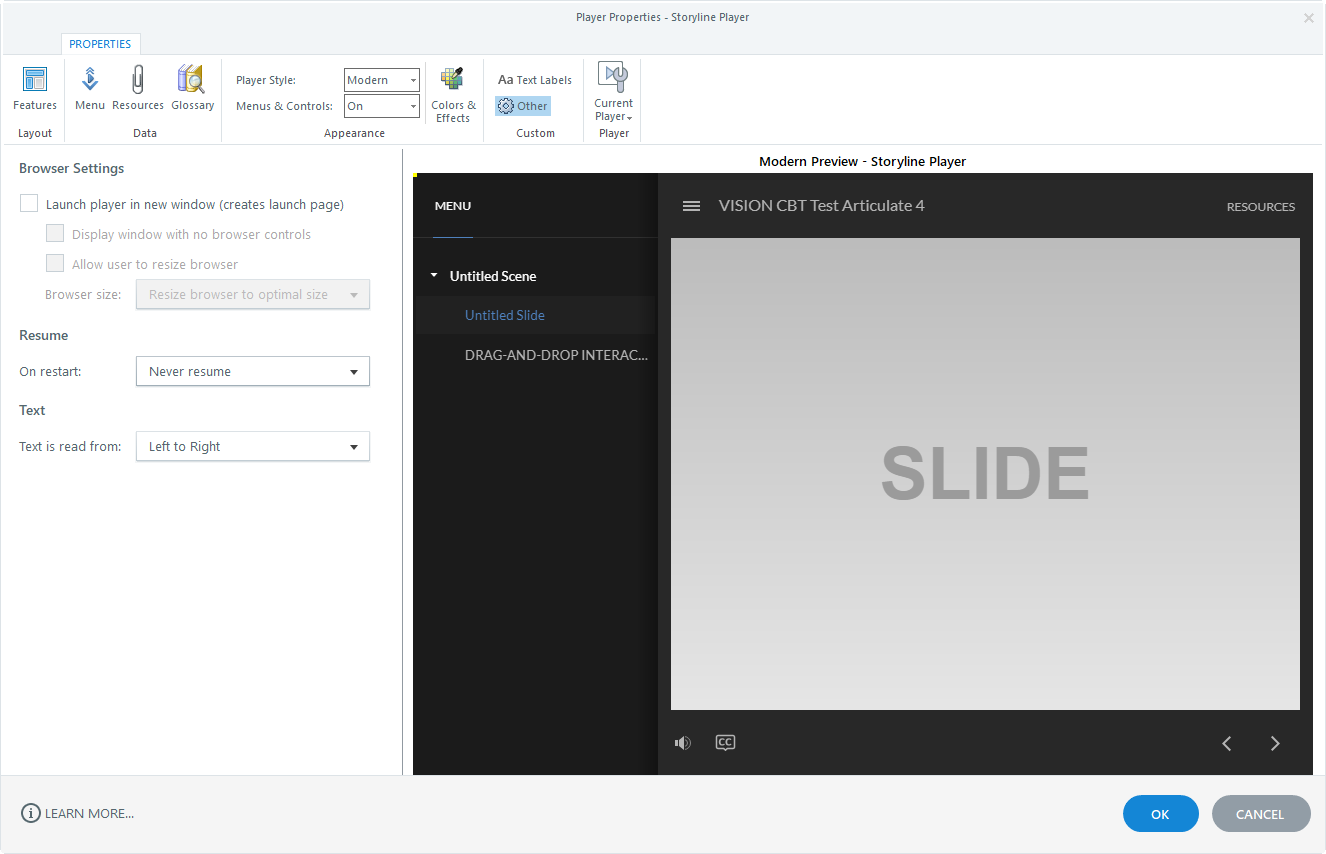
10.Click OK, then Publish the project.
11.Locate the newly published project on your machine.
12.Open the project folder and rename “story.html” to “index.html”.
13.Open index.html in a file editor of your choice.
a.You can open HTML with notepad or a similar basic editor. Right click on the HTML and select Notepad, or choose a different app.
14.Directly under the “title” tags, insert the following script into the <HEAD> section:
<script type="text/javascript"> setTimeout(() => { window.parent.postMessage('customHTMLStarted', '*'); }, "250"); </script> |
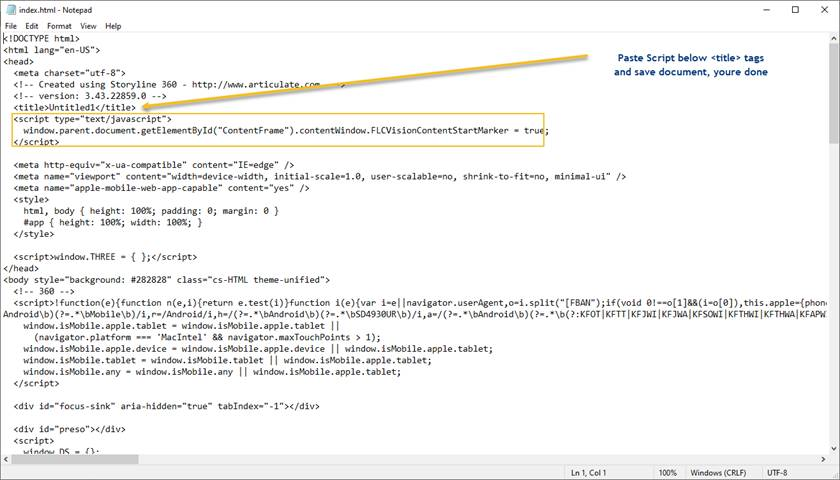
15.Save the file. Be sure to save it in a location where you will be able to access it from within VISION.
Note: the Articulate trigger can be placed on any slide in the Articulate module, but be aware whatever slide you decide to put the trigger on is the slide the user will be granted access to VLS navigation, and have the ability to proceed past the Articulate module.
Upload to VISION Developer
1.Create a folder in a place that you can get to from VISION Developer. VISION will remember and reopen the last folder that a user has gone to for content, so you may wish to designate a specific folder for all of your content.
2.Open VISION Developer and navigate to the objective that you want to attach this HTML content to.
3.Double-click on the objective to open it, and click on the Content page.
4.You may need to select a Classification from the drop-down menu. If you are unsure of which to select you can click the Advisor button for more information or select the Free Form classification.
5.Near the bottom of the page, click on the Web Module Actions drop-down menu.
6.Hover over Add and choose the Custom HTML option.
7.First you will be asked to save, and then a content box will open for a Title and a Description.
8.Enter a title for the content so that you will be able to recognize it in the future. Click OK.
9.A browser will pop up. Browse to the folder in which you saved your HTML file.
10.Highlight the index.htm file and click the Open button.
11. A pop-up will appear to confirm that the content was converted successfully, click OK.
12. To confirm that you published the correct files, you can click the Web Module Actions drop-down menu and select Preview.
13.Be sure to click the Deliver and Deliverable checkboxes and to Approve the objective.
Expected Behaviors
•The top navigation in VLS should be replaced with the message “Complete Content Below”
•The user should be able to open and close the event, as many times as they want. Provided they do not reach the “end” of the articulate project, the navigation will remain locked.
• As soon as the user reaches the articulate slide that you identified to be the completion of the module, the navigation will unlock, allowing the user to proceed through the rest of the objectives using the VLS navigation buttons.
•To complete a lesson in VLS, the user must navigate to the last page in the lesson, using the VLS navigation buttons. Simply viewing all of the WBT content will not complete the lesson.
Next Steps:
1.Log in to the Learning Station (you need access to the VDM project that contains the articulate content).
2.Add a new, or version, an existing course that contains the TU associated with your articulate project.
3.Add a new event to the course.
4.Add learners to the course.