Part 1: Set Up Documents for a Hold (Optional)
Protect Documents
If you need learners to only fill out certain parts of a document, you can use these tutorials to protect them:
•Microsoft’s instructions to protect part of a document
•Adobe’s instructions to create a PDF Form
Distribute Documents
There are several ways to link documents to a course and distribute them to your learners through the VISION Learning Station.
Link Documents to a Training Unit
When you link a document to a training unit or objective, learners will be able to access it in the lesson (to view, download, or print), either at the beginning of the lesson (when linked to the TU) or with the linked objective.
To link a document to a training unit, follow these steps:
1.Open the training unit’s properties on the Program menu.
2.Navigate to the Document Links page.
3.Click the Actions drop-down menu and select New Link to Address or New Link to File.
a.If you link a document by file, it might be blocked by some browsers (such as Chrome or MS Edge) for security reasons. We recommend linking by web address.
4.Select your file/address and then click the Link button.
5.Enter a Title and any applicable notes and then click OK.
6.Check the LS checkbox in line with the file. This is a very important step as the file will only be available if you check this box.
7.Click the OK button. Remember to mark the lesson as Completed-Active and Publish it to the LS.
Add a Link or File Location to the Lesson or Hold Text
You can always insert a link or file location in your lesson in Word or PowerPoint or include it in the text instructions on the Hold. Remember that you will have to keep the file in the same place for the duration of the lesson, and it must be stored in a location that learners will be able to access it. Even if you prefer to add a link to the lesson, you may wish to add it to the lesson’s Document Links page as well, just to keep track of it.
Email a Document Through the Course Event
Follow these steps to email learners in a course event:
1.Click on Administration on the Main Menu.
2.Click on the Courses tab. This is the default tab when entering the Administration area.
3.Click on the Active Events button for the course that has the event you want, and then click on the event link.
4.Click on the Learners tab.
5.Under "Select" check the names of the learners you wish to email and then click the Email Selected Learners button.
6.This will open your email client and enter the learner's email address in the "To" field and course event title in the "Subject" field.
Part 2: Create a Hold in VISION Developer
Holds allow VISION Learning Station instructors to prevent their learners from moving too far ahead in a course.
1.In the VISION Developer module, enter the Program hierarchy window and navigate to the appropriate training unit.
2.Double-click on the training unit to open it and then click on the Design page. You can access the objectives sequenced into the training unit from here.

3.Click the Content button at the bottom of the list of objectives. This will reveal the content objects in each objective. You can only set a Hold on content objects that are also marked "Deliverable".
4.Click on the Hold checkbox to stop learners from proceeding to the next content object. Note that the Hold will stop learners after they have viewed this content (and possibly taken any practice exam). If the "Require ordered objective completion" option has been selected in the course event, the learner won't be able to start the assessment until the hold is released.
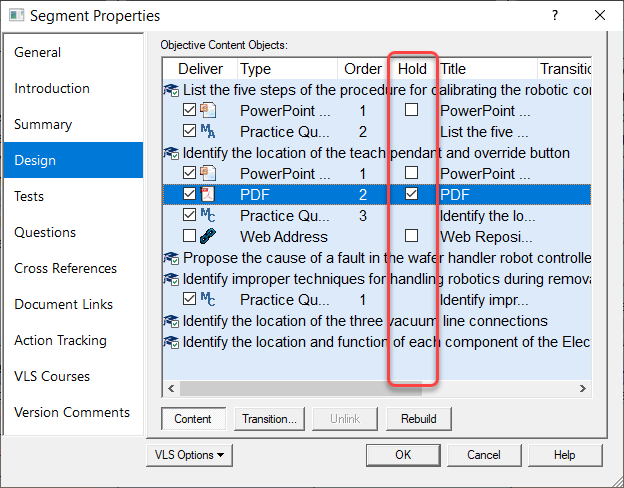
5.Enter the message that you want learners to see when they reach the Hold, such as "Wait for the instructor to release the next lesson".
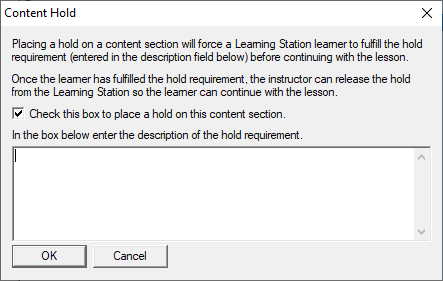
6.Click the OK button when you are finished placing Holds.
Part 3: When a Learner Encounters a Hold
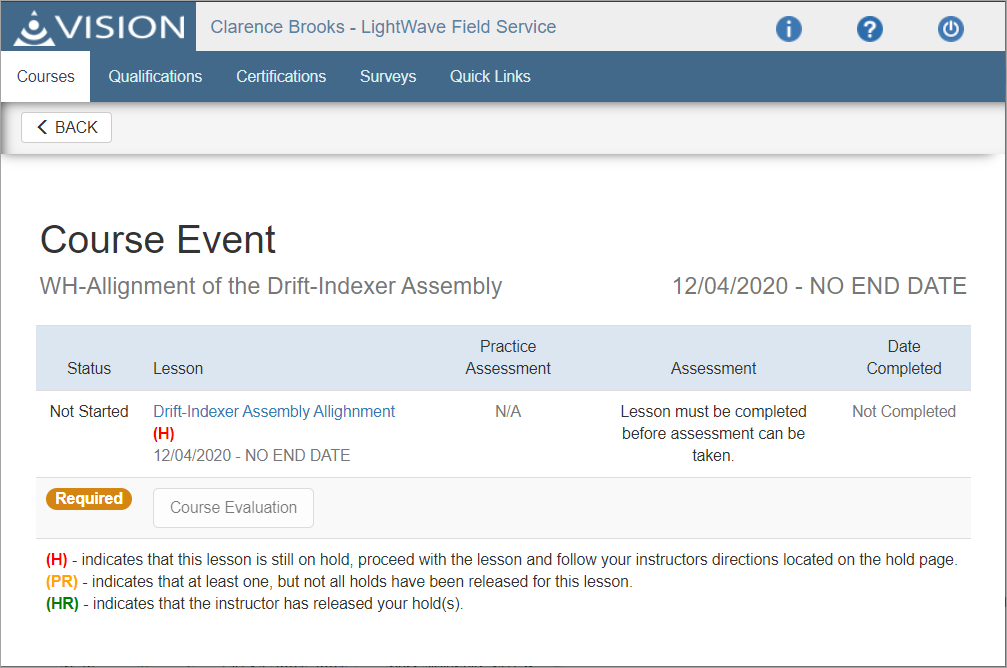
When a learner enters a course with a hold in it, they will see a red H icon, as in the image below.
When a learner comes to a Hold, they will see a screen like this, in the lesson:
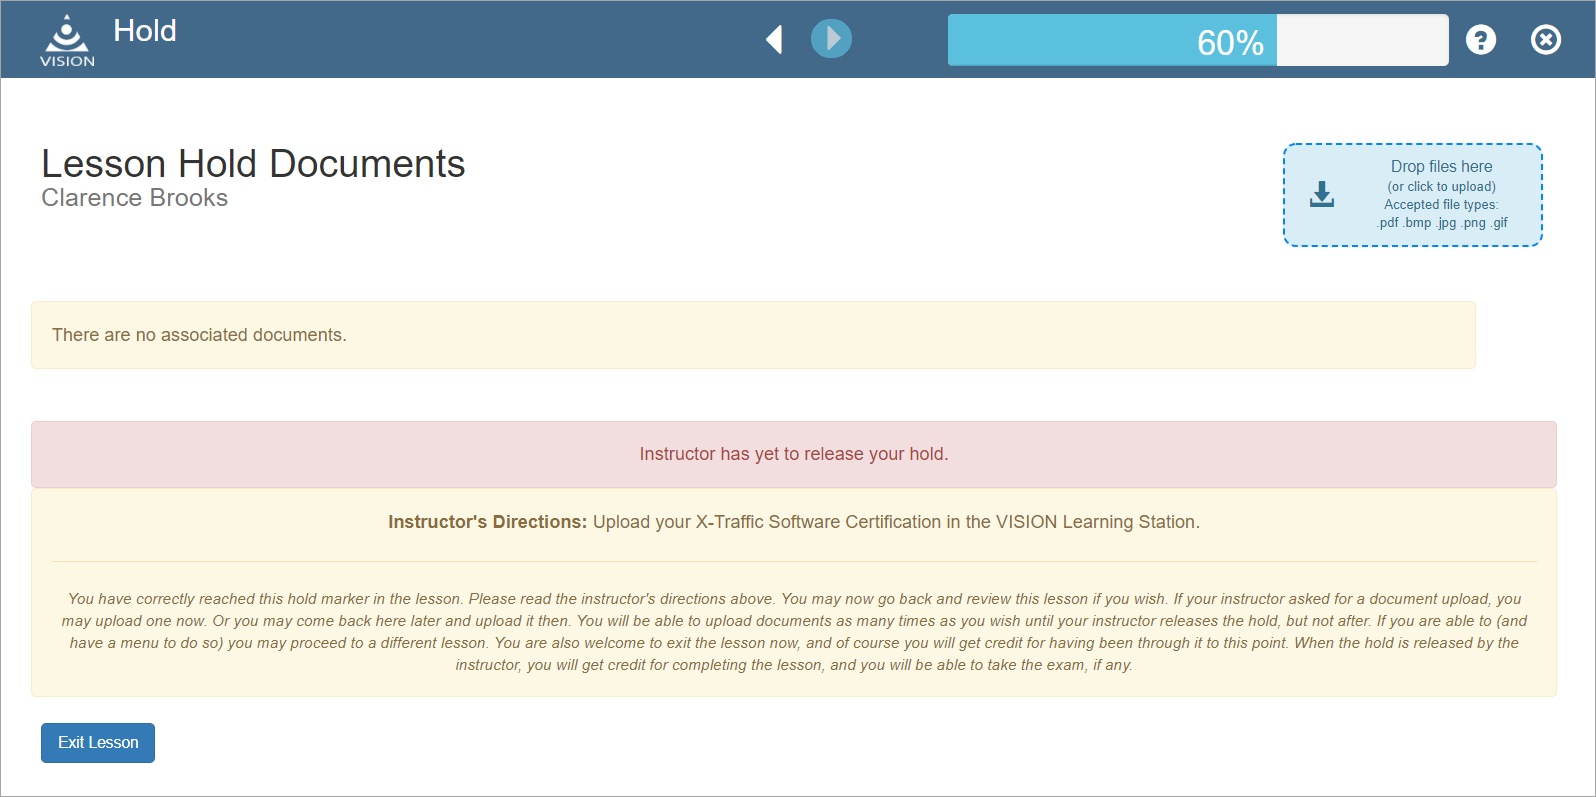
If they have the document ready, they can upload it right then. If not, they can exit the lesson, prepare the document, then resume the lesson and upload it. Do not use any special characters in the file name, as these can cause issues with saving it.
Learners can also add multiple documents. In the screenshot below the first document that the learner uploaded is listed.
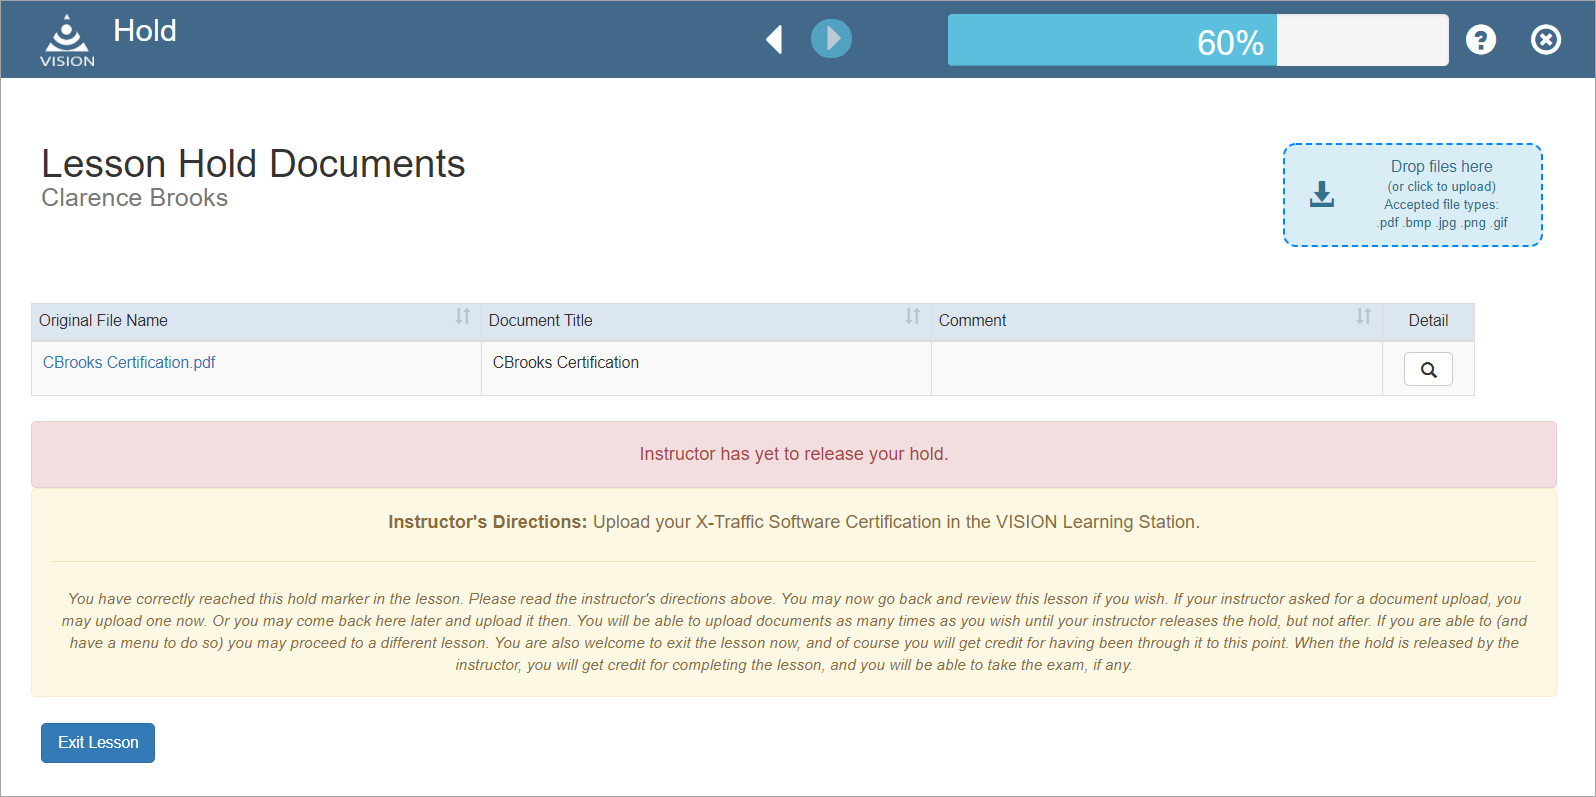
Once they have uploaded their document(s) they will need to exit the lesson and wait for you to release the hold.
Part 4: Release a Hold in the VISION Learning Station
Follow these steps to release course event holds:
1.Click on Administration on the Main Menu.
2.Click on the Courses tab. This is the default tab when entering the Administration area.
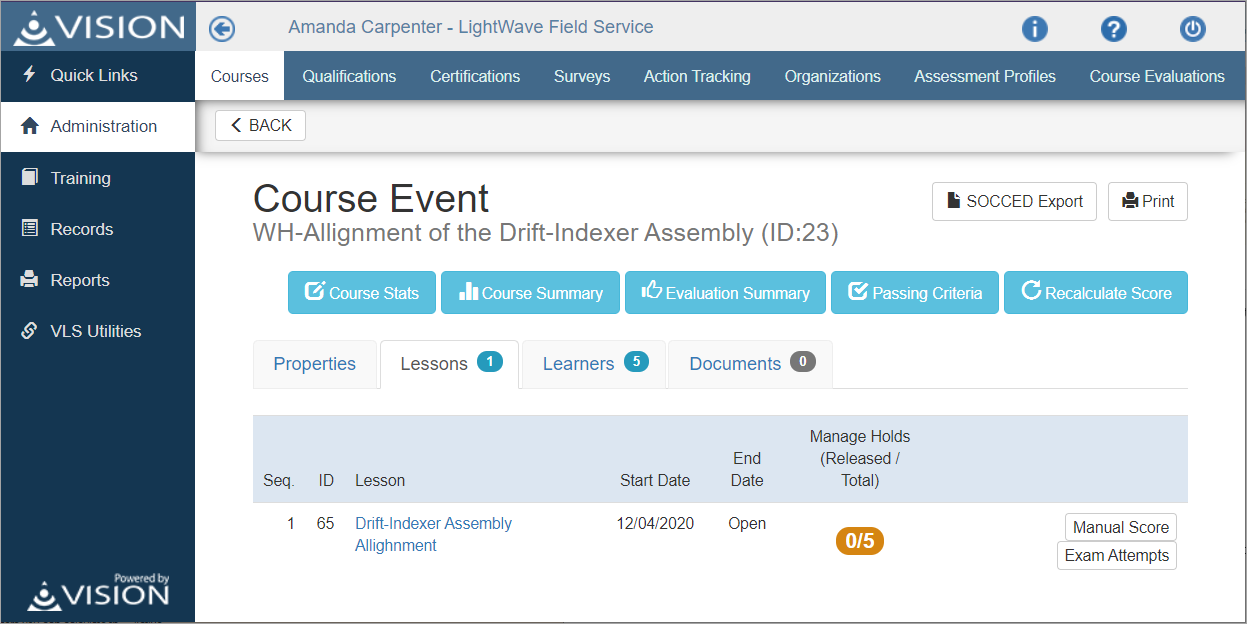
3.Click on the Active Events button for the course that has the event you want to edit, and then click on the event link.
4.On the Lessons tab, click on the orange Manage Holds button.
5.On the Student Holds page you can click the blue badge under “Documents” to open the uploaded document(s) and review them. Keep in mind that once you release a hold you cannot put it back or request more documents this way, so you should ensure that you received the correct document(s) before releasing the hold.
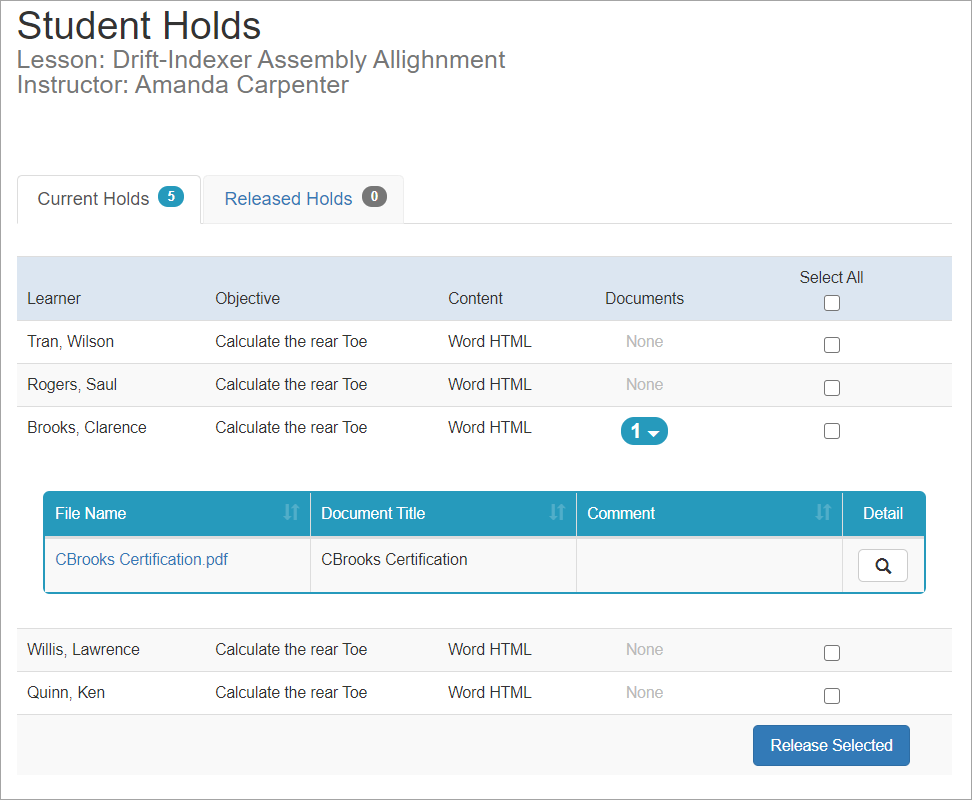
6.Click the checkbox for each learner you want to release the holds for and then click the Release Selected button. You can also check the “Select All” box to release all the holds at once.
Part 5: When a Learner Encounters a Released Hold
After you have released the hold, VLS will send the learner an email and the course will appear as it does below, with a green (HR) indicating that the hold was released.
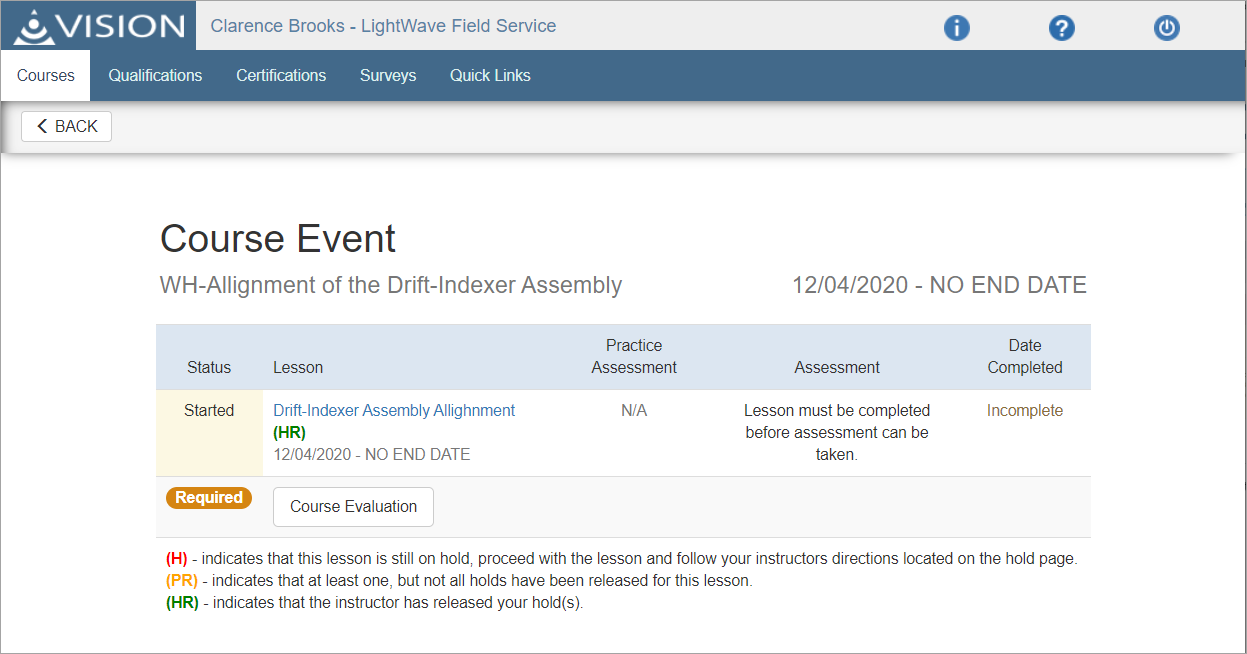
When the learner reenters the course event, they will be able to resume where they left off, and see this screen:

This screen will remain in the lesson so that the learner can review the document that they uploaded. They will not be able to upload any other documents for this hold, however.
Part 6: What If I need a New/Different Document but I’ve released the Hold?
As discussed, once the hold has been released a learner cannot upload more documents to it, but there are a couple of other things you can do.
•The learner can upload a document to their own user account in the VISION Learning Station. Do not use any special characters in the file name, as these can cause issues with saving it.
•You, the instructor, can upload a document to a course event.
Upload Documents to your VLS User Record
To upload documents for you user record, follow these steps:
1.Click on Quick Links.
2.Click on My Information.
3.Click on Learner Documents.
4.Your documents (if any) are listed. To upload new documents, either drag them onto the "Drop files here" area, or click on the "Drop files here" area to browse for them. Do not use any special characters in the file name, as these can cause issues with saving it.
View Documents on a Learner’s User Record (Requires Administrator Privileges)
1.On the Main Menu, click on Administration, and then the Users tab.
2.Click on an user record. You can use the filters to narrow down the list of names presented.
3.On the Status tab, click the User Documents button.
4.Click on the blue file name link to view the document. You can also print or download it.
Upload Documents to a Course Event
Follow these steps to select and modify a course event:
1.Click on Administration on the Main Menu.
2.Click on the Courses tab. This is the default tab when entering the Administration area.
3.Click on the Active Events button for the course that has the event you want to edit, and then click on the event link.
4.Click on the Documents tab.
5.Either drag a document onto the "Drop files here" area, or click on the "Drop files here" area to browse for a document to upload. Do not use any special characters in the file name, as these can cause issues with saving it.
